iOS Standford Note
这是斯坦福的大学公开课 - Developing iOS 8 Apps with Swift 之笔记。
视频源有很多,苹果的播客,YouTube,我是在 SwiftV 课堂 看的。
第一课:Logistics, iOS 8 Overview
没有太多知识要点。
以设计一个计算器为例进行知识点的讲解。
- iOS 介绍
- Xcode 界面
- Auto Layout 添加约束,修复约束
- 多个 view 可以关联到同一个事件响应函数
- let / var
- 在变量或类型上点 option + 鼠标左键,查看帮助文档,变量类型
- 初步介绍 Optional
第二课:More Xcode and Swift
Optional 的详细介绍,? ! 符号的意思
- ? 表示 optional
- ! 表示 implicity unwarp optional
在 Storyboard 中右击某个控件,弹出关联的 action
特殊字符 (unicode) 的输入方法
数组的两种初始化写法
 var operandStack = Array<Double>()
 var operandStack = [Double]()
computed property,很 cool
有了 computed property 后,java 中 getter,setter,javabean 这种就不需要了。
switch
使用闭包 + 类型推导,代码简洁度的演进,令人惊讶。
 switch operation {
   case "+": performOperation { + }
   case "-": performOperation { $1 - $0 }
   ...
 }

 func performOperation(operation: (Double, Double) -> Double) {
   // ...
 }
outlet,action
最后的时间讲了 MVC,这部分的 slide 很棒!
记住下面这张图 (delegate, dataSource)
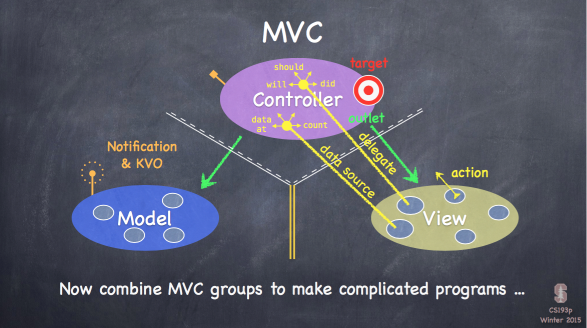
(model 和 view 之间没有通信,和 mvp 更像)
第三课:Applying MVC
这一节课主要演示将计算器的逻辑从 ViewController 中抽取出来,作为独立的 Model。形成 MVC 的结构。
在这个抽取的过程中,逐渐演示了 enum,字典,初始化,访问控制,tuple,值/引用,函数中内嵌函数等知识点。
enum
 enum Op {
   case Operand(Double)
   case UnaryOperation(String, Double -> Double)
   case BinaryOperation(String, (Double, Double) -> Double)
 }
定义数组与字典
 var opStack = Array<Op>()
 var opStack = [Op]()

 var knowOps = Dictionary<String, Op>()
 var knowOps = [String:Op]()
初始化 initilaizer
init() {}Swift 中操作符也是函数
knowOps["x"] = Op.BinaryOperation("x", *);access control
private / [default] / public
默认不写访问控制的话,在同一程序内是具有 public 的属性,但作为框架提供给其它程序使用时,具有 private 的属性
Tuple
数组和字典都是 Struct,Struct 是值传递,不是引用。Int / Double / String 也是 Struct。
func evaluate([let/var/inout] ops: [Op])传参数时省略了 let/var/inout,默认是 let,所以传参默认是常量,不可修改
值拷贝,没有想象中低效,swift 作了优化,只有在真正需要拷贝时才做拷贝
打开 Assistant Editor 后,Xcode 中 option + 鼠标左键选 navigation 中的文件,可以同时显示两个文件
函数中可以内嵌函数
第四课:More Swift and Foundation Frameworks
这一节没有演示代码,全是理论,详细讲解了一些 Swift 的基础知识。
这些内容我在 boxue 上都学过了,就略过。
- Optional 的详细介绍
- Array / Dictionary / Range
- class / struct / enum
- storedProperty / computedProperty
- 实例方法,类方法
- internal label, external label, _, #
- property observers: willSet, didSet
- initializer: designated, convience, failable, required, lazy
- AnyObject, type case, as? as! as
- String, String.Index (string 要用 String.Index 来索引,而不是 Int 值的下标)
Type Convertion (注意,这里不是 type casting,不用 as,而是用 type init 的方法实现类型转换,实际是生成了新的对象)
let d: Double = 37.5
let i = Int(d) // 实际是生成了一个新的 Int 类型的变量,使用 init(Double) 初始化方法
let a = Array("abcde")
let s = String(["a", "b", "c"])
Assertion,用于调试
第五课:Objective-C Compatiblity
这一节的重点是 view,以及自定义 view,初步看起来比 android 简单很多,只要重写 drawRect() 就行了。
String --> NSString
NSArray is bridged to Array
NSDictionary is bridged to Dictionary
Property List,哎,就是那个 .plist 啦,类似 android 中的 sharepreference,老头没讲清,半天不知所云。
Views: UIView, UIWindow
ViewController 有一个属性叫 view,是最顶层的 content view
CGFloat / CGSize / CGPoint / CGRect
单位 Point, contentScaleFactor
bounds / frame / center
坐标系
createView, UIView(frame: CGRect)
重点,custom view,继承 UIView,重写 drawRect(),调用 setNeedDisplay() 重新渲染。
两种方式实现 drawRect(),一种是传统地 c-like graphic api,叫 Core Graphics,一种是利用面向对象的 UIBezierPath。我们一般使用后者。
 // Create a UIBezierPath
 let path = UIBezierPath()

 // Move around, add lines or arcs to the path
 path.moveToPoint(CGPoint(80, 50)) // assume screen is 160x250
 path.addLineToPoint(CGPoint(140, 150))
 path.addLineToPoint(CGPoint(10, 150))

 // Close the path (if you want)
 path.closePath()

 // Now that you have a path, set attributes and stroke/fill
 UIColor.greenColor().setFill() // note this is a method in UIColor, not UIBezierPath
 UIColor.redColor().setStroke() // note this is a method in UIColor, not UIBezierPath
 path.linewidth = 3.0           // note this is a property in UIBezierPath, not UIColor
 path.fill()
 path.stroke()

 (疑问? UIColor 是怎么和 UIBezierPath 关联起来的...)

 // Alpha 透明度

 // Drawing Text
 let text = NSAttributedString("hello")
 text.drawAtPoint(aCGPoint)
 let textSize: CGSize = text.size // how much space the string will take up

 // Fonts (使用系统推荐的字体设置,不要自己设置字号?)
 UIFontTextStyle.Headline
 UIFontTextStyle.Body
 UIFontTextStyle.Footnote

 // Drawing image
 let image: UIImage = ...
 image.drawAtPoint(aCGPoint)        // the upper left corner of the image put at aCGPoint
 image.drawInRect(aCGRect)          // scales the image to fit aCGRect
 image.drawAsPatternInRect(aCGRect) // tiles the image into aCGRect
demo:自定义 FaceView
 class FaceView: UIView {
   override void drawRect() {
   }
 }
第六课:Protocols, Delegation & Gestures
这一课继续 Demo FaceView 的实现,使用可以在 Storyboard 中预览,可以用手势将其放大缩小,改变微笑的形状。
涉及到的知识点
@IDesignable, @IInspectable, cool!
在自定义的 FaceView 为整个类添加 @IDesignable 后,可以在 Storyboard 中预览效果
在属性上添加 @IInsepactable 后,可以在 property inspector 中直接修改其值
extension
用于功能分组,添加功能。不能添加 stored property,只能添加 computed property
protocol / delegation
delegation 是一种 protocol
dataSource 也是一种 delegation
用 weak 解决循环引用
??用法let smiliness = dataSource?.smilinessForFaceView(self) ?? 0.0如果前面的值为 nil 则取后面的值,否则取前面的值并解包
gesture
UIPinchGesture, UIPanGesture ...
用代码为 view 添加 gesture,或者在 Storyboard 中将 gesture 拖放到控件后,然后再拖到代码中生成 action 函数。二者效果是一样的。
何时为 faceView 添加代码和 gesture,在初始化的时候,在 property observer 中
 @outlet weak var faceView: FaceView! {
   didset {
     faceView.dataSource = self
     faceView.addGesture(...)
   }
 }

 @IBOutlet weak var pannableView: UIView {
   didSet {
     let recognizer = UIPanGestureRecognizer(target: self, action: "pan:")
     pannableView.addGestureRecognizer(recognizer)
   }
 }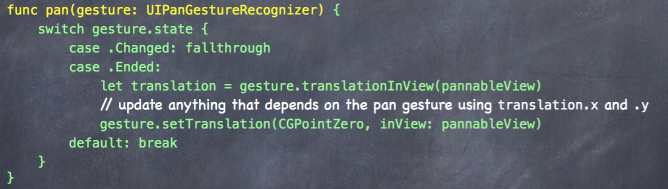
最后,还有多余的时间,老头在这一课讲了下一课的内容,Multi MVCs,一图胜千言。
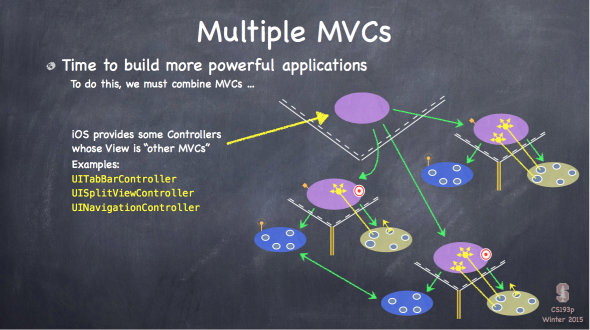
UISplitViewController,只在 iPad 上有效。
第七课:Mulit MVCs
主要 demo SplitViewController
- SplitViewController
- segue
- demo
- PopOver
segue
segue 有 4 种:show,show detail,modal,popover。
segue 总是创造新的 mvc
- 在 Storyboard 中创建 segue,然后在代码中重写 prepareSegue
- 在 Storyboard 中创建 segue,同时为按钮创建 action,在 action 函数中 performSegue(),performSegue() 实际也会调用到 prepareSegue()
方法:
func perfomSegueWithIdentifier(identifier: String, sender: AnyObject?)
func perpareSegue(segue: UIStoryboardSegue, sender: AnyObject?)
这里,要注意,在 prepareSegue 时, destinationViewController 中的 outlet 还没有值,还是 nil。(It is crucial to understand that this preparation is happening BEFORE outlets get set!)
prevent segue
func shouldPerformSegueWithIdentifier(identifier: String? , sender: AnyObject?) -> Bool
PopOver
PopOver 默认只有在 iPad 上生效,因为 iPad 屏幕大,在 iPhone 上默认是跳转到一个新的界面。所以要用 delegation 来强制指定它的 style。
iOS 的弹窗,比 android 复杂一些,iOS 上没有直接的 PopupWindow,弹窗也是一个 ViewController。
sub-MVCs
每一个 view controller 都一个 view contrller 的数组属性,这就是它们的 sub-MVCs
var viewControllers: [UIViewController] { get set }
怎么访问到一个 view controller 是包含在哪个 view controller 中呢
每个 view controller 都有三个父 view contrller 属性
var tabBarController: UITabBarController? { get }
var splitViewController: UISplitViewController? { get }
var navigationController: UINavigationController? { get }
在 Storyboard 中 wiring up MVCs
第八课:ViewControler LifeCycle
本节课主要讲了 View Controller 的 Life Cycle,以及 demo size class 的使用,auto layout 的各种高级使用
View Controller Life Cycle
 awakeFromNib(): 在 viewDidLoad() 之前调用,同时也用于 Table Cell

 viewDidLoad(): 只调用一次
 viewWillAppear(): 多次,当要显示的时候调用
 viewDidAppear()
 viewWillDisappear()
 viewDidDisappear()
 deinit()
Geometry Changed:
 viewWillLayoutSubviews()
 viewDidLayoutSubviews()
 // 用 setNeedLayout() 触发上述两者的调用
Auto rotation
viewWillTransitionToSize()AutoLayout 高级使用 / SizeClasses
在约束中尽量不要使用 magic nubmer,有 standard 和 0 替代
hugging, compressing
约束中,不光可以指定某个约束等于某个值,还可以指定为大于或小于某个值。
第九课:Scroll View and Multithreading
本节课的主要内容:AutoLayout / ScrollView / closure / 多线程
粗略补充 AutoLayout 的一个小功能
仅在某个 size class 下添加某个 view 或约束
ScrollView 的使用,滚动和缩放
ScrollView 一定要指定了 contentSize 才能生效。
scrollView.contentSize = CGSize(xxx)在 protocol 的方法前加上 @objc 关键字,表示此方法不一定要实现,可选实现,为了兼容 objective-c 的 delegate。
demo scroll view 的使用
显示网络图片。在主线程操作,引出多线程知识点
 if view.window != nil {
 }
 // 用这种方法来判断 view 有没有显示
closure 的使用
- 在类的 closure 中必须显示声明 self
- 如果在类的 closure 中使用了 self,同时类也拥有这个 closure 的引用,那么产生了循环引用,closure 中必须用 [unowned self] 声明 self,避免内存泄漏
- 但如果这个 closure 没有被任何对象引用,那么就不用声明 [unowned self]
多线程,在 boxue 中已经学习过,略
通过
dispatch_after执行迟时任务。如果在 Storyboard 中不方便选择 view 或为 view 添加约束,可以在 docuement outline 中操作。
第十课:Table View
本节简略讲了些 TextFiled 控件,keyboard 的内容,然后重点讲了 UITableView 的使用,并演示了一个 UITableView 的 demo。
TextFiled
firstResponder, resignResponder
keyboard
弹出 keyboard 时,要负责移动 view,以避免 keyboard 覆盖 view
UITableView: UIScrollView
TableView 的两种类型:
- .plain:显示大量动态数据
- .grouped:显示静态分组数组,一次性加载入内存,比如用于设置界面
UITableView,有 table header 和 table footer
其中的每一个 section,又有 section header,section footer,中间的主要界面就是 table cell
UITableView 显示的数据叫 section,是一个二维数组,NSIndexPath.section、NSIndexPath.row
cell type: 5 种,subtitle, default, right deatil, left deatil, custom
UITableViewController,它的 rootView 就是 UITableView
在 Storyboard 中当多个 view 层叠在一起,不好选择时, ctrl + shift + 鼠右选择,或者在 document outline 中选择
UITableView: dataSource (主要是设置这个), delegate
Demo: 搜索 twitter tag,展示内容,可以刷新,输入搜索内容
第十一课:Unwind Segues, Alerts, Timers, View Animation
本节课主要内容:
- unwind segue
- alert & action sheet
- NSTimer
- Animation (简略)
unwind segue
相当于 android 的 onActivityResult(),返回前一个 viewController 时,需要将数据携带返回。
Dismissing a Modally segued-to MVC while reporting information back to the presenter
如何使用:定义 @IBAction 的函数
Alert & Action Sheets
它们的调用方法很相似,只有参数 .style 不一样。
它们都是 viewController。
在 iPad 上需要额外加代码进行适配。
var alert = UIAlertController(title: "Redeploy Cassini",
                              message: "Issue commands to Cassini’s guidance system.",
                              preferredStyle: UIAlertControllerStyle.ActionSheet)
alert.addAction(UIAlertAction(title: String,
                              style: UIAlertActionStyle,
                              handler: (action: UIAlertAction) -> Void))
presentViewController(alert, animated: true, completion: nil)
NSTimer
定时器,好理解。tolerance 的概念,推荐加上。
Animation
共有 4 种:
- Animating UIView properties (属性动画?)
- Animation of View Controller Transition (转场动画)
- Core Animation (底层动画框架,最强大)
- Dynamic Animation (物理动画,具有碰撞检测等功能)
UIView Animation: 改变有限的几种属性
- frame
- transform(translation, rotation, scale)
- alpah(opacity)
The changes inside the block are made immediately (even though they will appear "over time").
属性改变立即生效 (? 有点不能理解,那么这个和 android 的属性动画不是一样的啊)
UIView Animation 默认带有几种很炫的动画效果,比如翻牌,溶解,,快进慢出。(在 keynote 中你可以体会到这几种动效)
第十二课:Dynamic Animation
这一节好有趣,实现了一个 DropIt 的游戏演示了 iOS 强大的 Dynamic Animation,所需要代码量却极少。
在 demo 的过程中还讲解了 lazy 的用法,解决循环引用的问题。
Dynamic Animation 的使用步骤:
- Create a UIDynamicAnimator
- Add UIDynamicBehaviors to it (gravity, collisions, etc.)
- Add UIDynamicItems (usually UIViews) to the UIDynamicBehaviors (UIDynamicItem is an protocol which UIView happens to implement)
That’s it! Things will instantly start animating!
主要掌握的是各种 UIDynamicBehavior 的使用:
- UIGravityBehavior
- UIAttachmentBehavior
- UICollisionBehavior
- UISnapBehavior
- UIPushBehavior
- UIDynamicItemBehavior
- UIDynamicBehavior
(Android 5.0 后也有 behavior 这种概念)
第十三课:Application LifeCycle and Core Motion
主要内容:
- NSNotifcation
- Application LifeCycle
- Core Motion
NSNotificaton
可以理解成 android 上的 EventBus,或者 broadcast / broad receiver
Application LifeCycle
记住这张图:
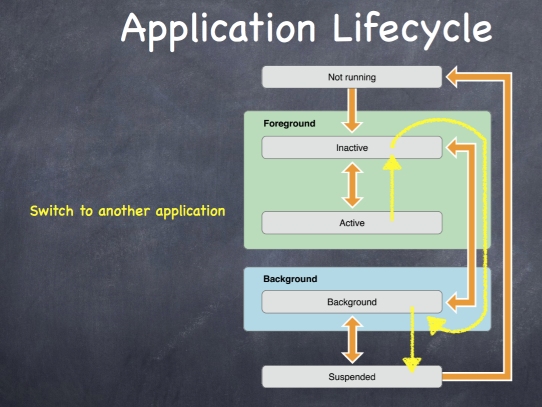
至于每个阶段的生命周期函数,用到时看文档。
AppDeleagate: UIApplication.sharedApplication().delegate
Core Motion
陀螺仪,重力加速仪...
将陀螺仪和上一节课的动画结合在一起做了一个 demo。
需要时再回头细看。
第十四课:Core Location and MapKit
这一课略读。
CLLocation
检测经纬度,速度,方向
CLLocationManager
要请求权限:requestWhenInUseAuthoraztion()
需要在 plist 中增加权限声明
CLLocation 需要在后台运行
错误检查
监控进入某区域内让系统唤醒此 App (GeoFence?)
MapKit: MKMapView
先略过,暂时对我来说没啥用。
第十五课:Modal Segues
剩下的暂时先不看了,目前为止,这些内容暂时够用了,需要时再看剩下的。
关键是要通过实践来掌握。
第十七课:Internationalization and Settings
国际化。
学习了 scheme 的作用,制作一份 scheme,将其语言改成某种语言,这样启动后的模拟器就会是这种语言。
也可以在预览中直接查看某种语言的效果。
代码中用 NSLocalizedString 实现国际化。
但是视频里的方案好麻烦啊,好像和 网上介绍的方法 不是很相同。从网上的方案来看,还是视频里的方案全能一些...